Coconut Daiquiri cupcakes February 3, 2013
Posted by inspiredbywolfe in Drinks, Sweet things.Tags: Dessert
2 comments
We’ve been on a shredded coconut kick in our household recently. Macaroons (not macarons) are a definite favourite, as are various coconut-based cocktails. So it will come as no surprise that the combination of coconut and alcohol came up in the discussion of desserts. Of course I am not the first to consider the combining of alcohol and cupcakes and there are many recipes for cocktails-turned-cupcake.
I used the basic framework of a daiquiri for my cupcakes – rum, lime, sugar – and coconut of course. I found a similar recipe on the fabulously-named Bake It With Booze blog, and made a half-recipe to end up with about 15 cupcakes. I appreciated that this recipe had rum in the batter as well as in the icing – and a good slug of it to boot.

Once they were cooled, I made up what can only be described as rum buttercream – icing sugar, butter, and rum in the place of the usual water I use when making buttercream. It was quite boozy! I smoothed some icing onto the cupcakes and then decided that this already indulgent cupcake needed more.

I worked in batches of three or four, icing them and then dunking them into a bowl I’d filled with more shredded coconut. The end result was a tray full of snowballs in garish wrappers.

Then it was merely a matter of decorating the cupcakes appropriately before serving.

Yes, we are the type of household to have little paper umbrellas to hand. No, I did not realise the colours of the umbrellas were so closely matched to the colours of the cupcake wrappers until I went to put them in – but I was pleasantly suprised by this!
As for the cupcakes themselves, they were definitely boozy – primarily from the rum in the icing. The flavour of the icing was great, and definitely something I intend to repeat. It wasn’t to sweet, and the rum contributed some great vanilla notes as well. I also really liked the cupcakes’ texture – fluffy and light, but with a definite chewy texture thanks to the shredded coconut in the batter. The lime came through nicely too.

While it wasn’t quite like being transported to some tropical island, eating these cupcakes was almost like drinking a coconut daiquiri. I think that more cocktail-based desserts will definitely be part of my future.
Vinegar date (and apricot) cake January 13, 2013
Posted by inspiredbywolfe in Fruit, Sweet things.Tags: Desserts
1 comment so far
I’m a big fan of vinegar and certainly use a lot of it, in brines, salads and of course, shrubs. But I don’t normally put vinegar in my cakes. Until I found these recipes, that is. I was really intrigued by the notion of adding vinegar to cakes and wondered if it would operate in a similar way to a shrub, adding brightness and tartness without actually tasting of vinegar.
Naturally I wanted to try making a vinegar cake as soon as I could. I used the second recipe on the page – but then adapted it slightly. I didn’t have enough dates so I decided to use some dried apricots too. Then I didn’t have enough of those either, so made up the difference with some dried cranberries. After I’d chopped the dates and apricots, I added them and the cranberries to a saucepan and simmered them in red wine for a few minutes.

Once that had cooled slightly, I added butter and stirred it in until it melted. Next I added olive oil, the vinegar, and then more normal cake things – sugar, eggs, flour. It was great being able to mix everything in the saucepan, and I was rewarded with a nice looking batter.

I poured the batter into a springform tin, and topped it with some slivered almonds (yes, yet another deviation from the recipe…). I baked it for about 45 minutes and left it to cool in its tin.

When it was cool, I carefully removed the sides of the tin and cut a slice. It was much fluffier and moister than I’d been expecting – I was expecting more of a fruit cake-type consistency. But I was definitely pleasantly surprised by the texture.
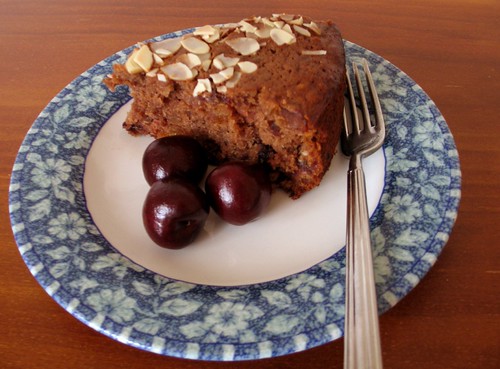
Having no cream or icecream in the house, I made do serving this with some fresh fruit. The cake itself was great and I was very happy with the combination of the fruit. As expected, I couldn’t taste the vinegar specifically but there was a general tartness which definitely brightened up the cake. As I am not a huge fan of traditional fruit cakes, I am very pleased to have found a substitute – and it has the added bonus of continuing my use of vinegar.
Merry Christmas and good luck! December 23, 2012
Posted by inspiredbywolfe in Sweet things.Tags: Desserts
add a comment
A quick post to say best wishes to everyone over the Christmas period, and good luck with everyone’s cooking over this time! May your meat be succulent, your sauces smooth (unless they’re not meant to be) and your desserts delectable.
I have gone a little baking crazy these holidays. Over at Food Replicator I made some gingerbread, which also resulted in about 50 gingerbread cookies of various shapes. Then thanks to a great Kris Kringle present, I found myself with a silicone pan for cakes in the shape of presents, so of course I had to try it out!
I used my standard chocolate cake recipe, which was fairly dense, and was pleased to see that the equivalent of one cake filled the small cake molds. Once cooked, they released from the mold very easily. I let them cool then decorated them fairly simply: a thin layer of fondant to let the design show through, and then I painted them with watered-down gel colours.

Very cute, and useful for birthdays and valentines day too!
Merry Christmas, Happy New Year, and all good things.
Lemon meringue swirls December 9, 2012
Posted by inspiredbywolfe in Fruit, Sweet things.Tags: Dessert
1 comment so far
Faced with an excess of eggwhites after making my apparently now-annual eggnog, I had a look around for what to do with them. I was thinking something to do with meringues, maybe something lemony… when I came across this fabulous idea for lemon curd meringue nests. Here’s my interpretation, although mine are not as cute…
I should note I also had 12 eggwhites to use up so ended up with a lot more nests than the original recipe! But the concept was the same. I started by whipping the eggwhites until they reached soft peaks, and then added caster sugar. I whipped them again until they reached firm peak stage.

I transferred the meringue mixture to a piping bag, and piped out disks onto a sheet of baking paper. I pushed down the peaks with the back of a spoon dipped in water.

As you can see, mine were a bit bigger than the recipe’s, but I figured I had a lot of meringue to use up! Once I’d done the base, I went back and piped two rings on top of the base, to create the sides. The original recipe only called for one ring for the side, but I liked the idea of mine being a bit higher and having more room for the lemon curd.

The meringue was a lot easier to work with than I’d been expecting, and I certainly found that they held their shape very well. I actually had too many meringues to cook at once, so had to leave some on the counter, and even those ones were fine when they were cooked.

I then baked them in a low oven for about an hour and a half, and then let the oven cool with the shells still inside.
At this time I also turned to the lemon curd. Unfortunately I didn’t take any photos from the process, but I used the lemon curd recipe from the same site that the meringue recipe came from. It was called the best ever lemon curd – and I have to agree. I’ve not had much success with lemon curd in the past but this recipe was easy, tasted very lemony and actually thickened as it was meant to!
As the lemon curd also needed time to cool overnight, I left both the meringue shells and the curd overnight and resumed the next day. I should say that the meringues were absolutely fine the next day – still hard and crispy. I assembled my shells ready for filling.

As you can see some of the shells had gone a little brown on top, but I was still pretty happy with how they came out. Then it was simply a matter of filling the shells with the lemon curd. I found that even though I’d added an extra layer of meringue ‘wall’ the shells still only took a couple of teaspoons of the curd. Anyway, since mine are on the large size, one was the perfect size for an afternoon snack.

As well as being a great way to use up all those egg whites, I really enjoyed these lemon meringue nests. They weren’t too sweet and were a clever play on the more traditional lemon meringue pie. The curd was fantastic and very lemon-y which worked very well with the sweet and fluffy meringues.
I was very pleased to use up all my eggwhites in this way, and will certainly be making these again. I can see these being a very useful transportable dessert to take to events – and they’re just a bit fancy to boot.
Sweet and savoury scrolls December 2, 2012
Posted by inspiredbywolfe in Bread, Sweet things.1 comment so far
I am a big fan of various types of pastry scrolls and have been meaning to make some for a while. Finally, I got my act together and decided to make a big batch of scrolls. Because I was doing such a large batch, I decided to make half sweet and half savoury.
I started by mixing up the dough; I followed this recipe but omitted the sugar. I left it to rise and got on with making the fillings. For the savoury filling, I chopped up red onion, bacon and kale and mixed them together. For the sweet filling, I combined lemon juice, sugar, diced pear, raspberries and cinnamon.

After the dough had risen, I divided it in two and started rolling each piece out. I aimed for a rough rectangular shape, and rolled it out quite thin. I started with the savoury one, and first brushed some almost melted butter over the dough. I then spread the savoury mixture over the dough, and scattered on a layer of parmesan cheese.

Once I’d spread everything out, I rolled it up lengthways, and stuck the dough seam down with a bit more butter. I started by using a butterknife to chop the roll into sections, but found that the butterknife was pressing down on the dough and squashing all the layers together. So I switched to a very sharp knife and slowly cut through the layers – this seemed to work better.
I placed the rolls in a tin I’d prepared with some oil spray, making sure they didn’t touch each other. I left these to rise again while I prepared the sweet rolls.

I left them to rise until they’d doubled in size, about 1 hour. By this time they’d all spread enough so they were squashed together – here’ a photo of the sweet scrolls after they’d risen the second time.

Then it was time to bake! While the recipe said the scrolls would be done after 25 minutes, it actually took about 35-40 minutes until they were cooked and nicely brown.

While I ended up with lots of scrolls to eat, this did not seem to be a problem! I did prefer the savoury scrolls but also enjoyed the sweet ones. The savoury ones were salty and a little sharp from the parmesan, and the onion flavour had permeated throughout the dough. This was offset by the kale, some of which had become crispy during the cooking process. The sweet ones were not too sweet and instead the lemon and cinnamon came through strongly.
I really do enjoy these types of doughs so will be sure to make more in the future. I was just sorry I had not made them before now.
